Synopsis
About caMicroscope
caMicroscope is a Web Based Annotation and Visualization Platform for Digitized Whole Slide Images.
It is a tool to view, annotate, and analyze whole-slide, biomedical images. It manages digital pathology images, associated clinical and imaging metadata, and human/machine generated annotations and markups.
About the project
The goal of this project is to allow model developers to test their trained models on the selected area of WSI.
Why this feature is needed
In general, the deep learning models are tested on a batch of images and later the predictions are visualized using various tools. If a whole slide image pertaining to a model is available, the model developer has to manually crop the required region he/she wants to test the performance on. This can be tedious if one wishes to test on specific regions of the WSI.
By the addition of this feature to allow testing the models in the image viewer itself will likely improve the productivity and would allow the developer to have better insights about the performance of the model by being able to test it across the WSI.
What is implemented
caMicroscope has an app that allows nuclei segmentation using watershed algorithm. It is extended to allow user to upload and test the segmentation models. An additional app to allow user to upload and test the classification models.
How it is implemented
The proposed features are implemented using TensorFlow.js. TensorFlow.js is a library for developing and training ML models in JavaScript and deploying in browser.
Models developed using Keras are compatible after a straighforward conversion.
Mentors
-
Ryan Birmingham
-
Nan Li
Background
Whole Slide Imaging
Whole slide imaging1 refers to scanning of conventional glass slides in order to produce digital slides. Prior to the introduction of WSI, digital imaging in anatomic pathology relied largely on microscope-mounted cameras to produce “static” digital images. These static images were of limited clinical utility because they captured only specific regions of a glass slide. WSI, also commonly referred to as “virtual microscopy”, aims to emulate conventional light microscopy in a computer-generated manner.
Practically speaking, WSI consists of two processes. The first process utilizes specialized hardware (scanner) to digitize glass slides, which generates a large representative digital image (so-called “digital slide”). The second process employs specialized software (ie, virtual slide viewer) to view and/or analyze these enormous digital files. caMicroscope is one such virtual slide viewer.
TensorFlow.js
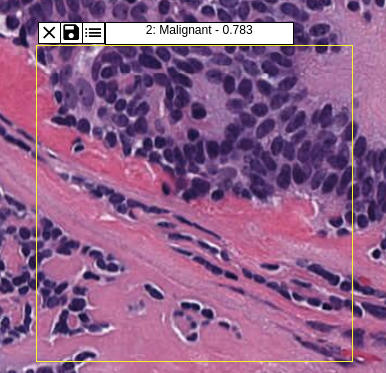
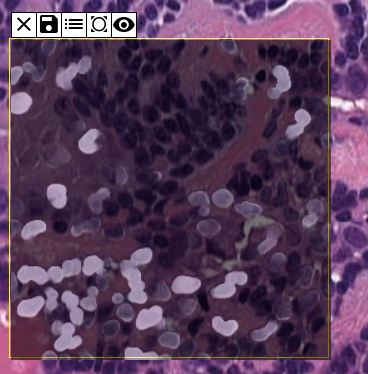
The models are executed in the client’s browser using TensorFlow.js. The viewer of segment and predict app allows the user to draw the region of interest in the integral multiple of the input patch/image size of the model. The model is executed on each window. The models are temporary stored using IndexedDB to make it possible to compare the performance of models on the different ROIs.
For classification, i.e., predict app, the result displayed in the class with maximum average probability across all the windows. A CSV file can be downloaded which contains the probabilities of individual classes.
For segmentation, the user can adjust the opacity of the mask to verify the performance of the model.
How to use

First the model is to be uploaded. While uploading, make sure to fill in correct values for input size and image type. While uploading the model is tested to ensure only valid models are saved in the IDB.
Both the apps have the similar toolbar. After uploading the model, the user can select the model & pre-processing method and draw the ROI by checking the first tool. The selected model will be executed.
The user can save ROI, mask, probabilties using relevant tools. A detailed user guide can be found here.
It is recommended to test the model on the same zoom level as the training images.
Creating models compatible with caMicroscope
caMicroscope uses TensorFlow.js for deploying machine learning models. Keras models (typically created via the Python API) may be saved in one of the several formats. The “whole model” format can be converted to TensorFlow.js Layers format, which can be loaded into caMicroscope. You’ll need to install the converter
pip install tensorflowjs
  import tensorflowjs as tfjs
  import keras

  model = keras.models.Sequential()   # for example
  ...
  model.compile(...)
  model.fit(...)
  tfjs.converters.save_keras_model(model, tfjs_target_dir)
Or if you already have Keras model in the format model.hdf5, convert to TensorFlow.js Layers format using the following bash command:
  tensorflowjs_converter --input_format keras \
                       path/to/my_model.hdf5 \
                       path/to/tfjs_target_dir
The target TensorFlow.js Layers format is a directory containing a model.json file and a set of sharded weight files in binary format. The model.json file contains both the model topology (aka “architecture” or “graph”: a description of the layers and how they are connected) and a manifest of the weight files.
If you’re uploading an offline copy, upload the model.json in the first input and all (and only) weight files in the second input. If the model is hosted, toggle to link a hosted model and enter the URL to model.json. A demo is linked here.
Pull Requests
Phase 1
Phase 2
Phase 3
- Change UI and patchwise prediction instead of hard resize
- Allow to select preprocessing technique
- Segmentation sample models
How to contribute
caMicroscope should be deployed as part of a stack.
- Clone caMicroscope.
-
Clone the Docker distribution from camicroscope/Distro.
- In the above repo, edit caMicroscope.yml and mount the cloned repo of caMicroscope as a volume under viewer as below.
  viewer:
    build: "../caMicroscope"
    container_name: ca-front
    volumes:
      - ./config/login.html:/var/www/html/login.html
- ../caMicroscope/:/var/www/html/ -
Change the current directory to Distro
cd Distro -
Run with
docker-compose -f caMicroscope.yml up -
Once everything is up, go to http://localhost:4010/.
Future improvements
- Support for tensorflow/tf_hub graph models. Currently (Aug-2019), tensorflow.js allows saving only the layersModel. The graph models are supposed to be used right away and can’t be stored. Tf_hub models are to be downloaded everytime. This issue is tracked here. Although, an experimental feature can be added to use graphModels right away.
End note:
I really enjoyed working on the project. The most important part is I learnt a lot many technologies while working on this project. I realised a lot many areas I need to work on. This whole program made me a better developer than I was before.
I’d like to thank my mentors for being supportive during this whole period and guiding me! :)